MacOS is the operating system designed and developed by Apple Inc. specifically for their line of Mac computers. It is known for its intuitive user interface, powerful features, and seamless integration with other Apple devices. However, with the advancement of technology and the increasing demand for cross-platform compatibility, some users may want to run macOS on non-Apple devices. This is where VMware Fusion comes into play.
VMware Fusion is a virtualization software that allows users to run multiple operating systems on a single computer, including macOS, Windows, and Linux. It utilizes the concept of virtual machines, creating a fully functional computer within the user’s existing operating system. With VMware Fusion, users can have the flexibility to test or use macOS on their preferred device without needing an actual Mac computer. In this tutorial, we will guide you through the steps to install macOS Sonoma on VMware Fusion, allowing you to experience the latest version of macOS on your personal computer.
Table of Contents
How to install macOS Sonoma on VMware Fusion on macOS
Installing macOS Sonoma on VMware Fusion is a useful and convenient way to experience the latest macOS operating system on your Mac computer. This virtualization tool allows you to run multiple operating systems on the same computer, enabling you to test out new features and updates without affecting your existing setup. In this guide, we will walk you through the step-by-step process of installing macOS Sonoma on VMware Fusion on macOS, so you can enjoy the latest features and performance improvements of this highly anticipated operating system.
- How to Install macOS Sonoma on a virtual box on the AMD system?
- Three methods to Install/Update to macOS Sonoma | Fix Fail to Install macOS Sonoma
- What sounds do raccoons make? The Clues to Their Cunning Behavior
Downloading the installer
If the macOS version you’re aiming for is current, you can get it from the App Store, but you’ll need the exact link as Apple conceals older versions from search results to prevent users from unintentionally installing them.
Finding the necessary one is fairly simple: just search for “How to upgrade to macOS <Sierra>” (replace with the necessary version) on Google, and the first thing that typically comes up is an Apple Support page (such as this one), which has links to the App Store for the more recent versions (macOS High Sierra, macOS Mojave, macOS Catalina), or to the actual distribution package (dmg) for the more ancient versions (macOS Sierra, macOS El Capitan, macOS Yosemite).
On the App Store app’s application page, select “Get.” The installation app will launch automatically after the download is complete, but you can end it at any time. The installed application will stay in the Applications folder.

Troubleshooting
If you attempt to download it from the App Store and receive the message “The requested version of macOS is not available,” it’s generally one of the two.

1. As it appears below, you have been accepted into the beta program. Unenroll as instructed here to solve it.

2. The administrators of your organization are in charge of managing your updates, and your Mac receives updates from a private repository that frequently lacks earlier installs (see screenshot below). Generally, you shouldn’t do anything about it as it would probably be against business policy, but if you have sufficient authorization, you can Google how to change this option.

Installing macOS into VMware Fusion
1. Download a macOS installer: The first step to installing macOS into VMware Fusion is to obtain a macOS installer. This can be done by downloading the installer from the App Store or a reliable third-party source.
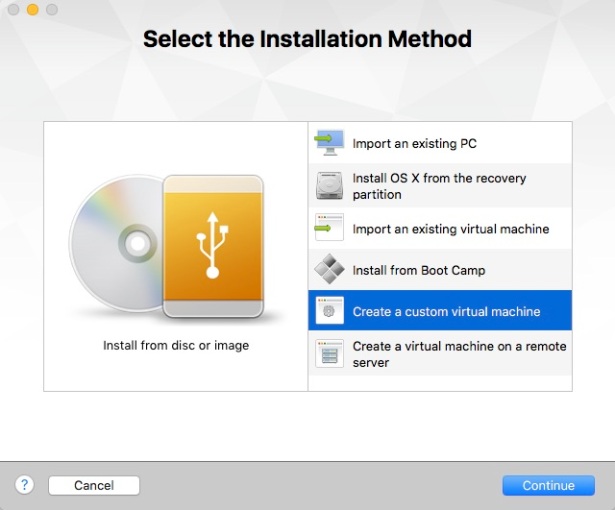
2. Create a new virtual machine: Open VMware Fusion and click on the “New” button. Select “Install from disc or image” and then click “Continue.”.
3. Select the installer image: Click “Use another disk or disc image” and then browse to the location where you saved the macOS installer. Select the installer and click “Continue.”.

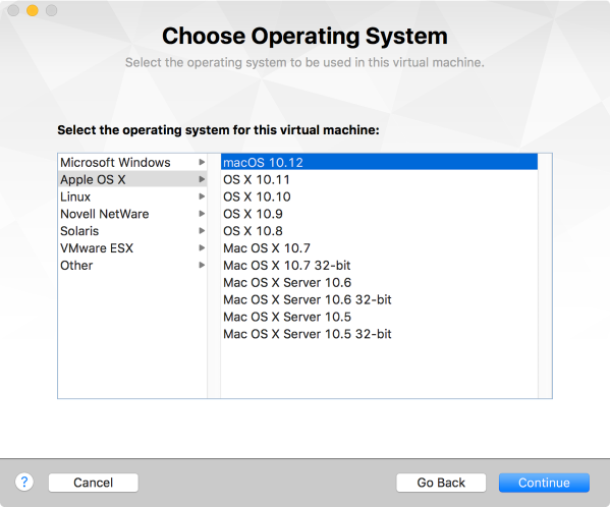
4. Choose the operating system: VMware Fusion will detect the operating system of the installer and select it automatically. If it does not detect it, choose macOS manually and click “Continue.”.
5. Set up a virtual machine: Name your virtual machine and choose the location to save it. You can also customize the disk size and other settings as desired. Click “Continue” when you are done.
How to Install macOS Sonoma on VMware
Step 1: Download VMware: To install MacOS Sonoma on VMware, you will first need to download VMware Fusion or VMware Workstation. These virtualization software programs allow you to create and run a virtual machine on your computer, acting as a separate operating system.

Step 2: Download the MacOS Sonoma installer
Next, download the MacOS Sonoma installer from the links below. This installer contains the necessary files to install and run MacOS Sonoma on your virtual machine.
Step 3: Create a new virtual machine
After downloading VMware, open the application and click on the “New” button. This will start the virtual machine creation wizard. Select “Install from disc or image” and click “Continue” to proceed.

Step 4: Choose the MacOS Sonoma installer
On the next screen, click “Use another disc or disc image” and then “Browse.” Navigate to where you saved the MacOS Sonoma installer and select it. This tells your virtual machine to use the installer as its operating system source.

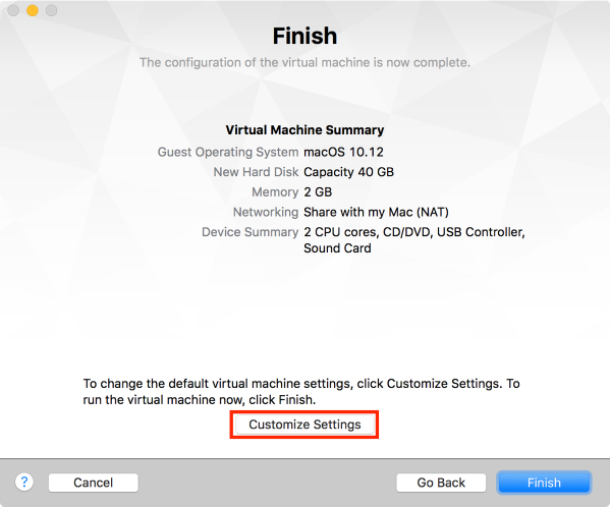
Step 5: Customize virtual machine settings
You will now need to customize the virtual machine settings. Give your virtual machine a name and choose its location and size. This is where the virtual machine’s files will be stored on your computer. Then, allocate the desired amount of RAM and processors to the virtual machine. Once finished, click “Finish.”

Step 6: Start the virtual machine
Double-click the virtual machine you just created to start it. This will begin the boot-up process, and the virtual machine will display the MacOS Sonoma installation screen.

Step 7: Install macOS Sonoma
Follow the instructions on the installation screen to install MacOS Sonoma on the virtual machine. This will involve selecting the language, agreeing to the terms and conditions, and choosing the desired hard drive to install MacOS Sonoma.

macOS Sonoma
Step 8: Configure MacOS Sonoma
Once the installation is complete, you will need to go through the setup process to configure MacOS Sonoma. This will include setting up a user account, choosing preferences such as display and privacy settings, and connecting to the internet.

Step 9: Install VMware tools
VMware tools are software that enhances the performance and functionality of a virtual machine.
- To install these tools, go to the “Virtual Machine” menu at the top of the screen
- Then select “Install VMware tools.”
- This will open a virtual CD on the virtual machine’s desktop.
- Double-click on the “Install VMware Tools” icon and follow the instructions to complete the installation.

Install VMware Tools
Congratulations! You have successfully installed MacOS Sonoma on VMware! You can now use the virtual machine to run MacOS Sonoma on your computer. Remember to regularly update both VMware and MacOS Sonoma to ensure optimal performance. This will ensure that you have the latest features and bug fixes for a smoother experience. Happy exploring with your virtual MacOS Sonoma environment!
FAQ
1. What is a virtual machine, and why do I need it to install MacOS Sonoma on VMware?
A virtual machine is a software program that creates a simulated environment on your computer. It allows you to run a completely different operating system, such as MacOS Sonoma, without interfering with your computer’s main operating system. Installing MacOS Sonoma on VMware is necessary because it provides a safe and isolated space to run the operating system without affecting your existing system files, programs, and settings.
2. Do I need to purchase VMware Fusion or VMware Workstation to install MacOS Sonoma?
Yes, you must purchase either VMware Fusion or VMware Workstation to install MacOS Sonoma. These are paid virtualization software programs that allow you to run multiple virtual machines on your computer. However, they offer free trials for you to test out the software before purchasing it.
3. Can I install MacOS Sonoma on VMware if I have a Windows computer?
Yes, you can install MacOS Sonoma on VMware on a Windows computer, as long as it meets the system requirements. However, you may encounter limitations or compatibility issues as MacOS Sonoma is designed to run on Apple devices. It is recommended to check with VMware and Apple for the latest compatibility information before proceeding with the installation.
4. What are VMware tools, and do I need to install them?
VMware tools are software programs that improve the performance and functionality of the virtual machine. They provide features such as screen resolution adjustment, mouse integration, and drag-and-drop functionality. It is recommended to install VMware tools after installing MacOS Sonoma on VMware to enhance your virtual machine experience. However, if you do not wish to install them, you can still use MacOS Sonoma on VMware without any major limitations.
conclusion
In conclusion, installing MacOS Sonoma on VMware Fusion on a MacOS device is a convenient and practical option for exploring the new features that this latest operating system has to offer. By following the steps outlined above, you can easily set up a virtual machine and install MacOS Sonoma without the need for an external bootable disk or a recovery partition. It is recommended to regularly update both VMware and MacOS Sonoma for optimal performance. With the help of VMware tools, you can enhance your virtual machine experience and fully immerse yourself in the new and exciting features of macOS Sonoma. So don’t wait any longer; go ahead and try out this easy and efficient way of experiencing MacOS Sonoma on your device
